


Table of Contents
- Why Period Homes Need a Different Approach to Timber Flooring
- Subfloor Preparation for Old Houses: Moisture, Levelling, and Repairs
- Solid Timber vs Engineered Flooring for Heritage Homes
- Acclimatisation and Weatherproofing Before Installation
- Installation Methods: Floating Floor vs Direct Stick
- Tools, Adhesives, and Fixings for the Job
- Cost of Timber Flooring Installation: What Affects the Price
- Heritage Compliance, Restoration vs Replacement, and Acoustic Insulation
- Frequently Asked Questions
Last Updated: September 13, 2026
Why Period Homes Need a Different Approach to Timber Flooring
Timber flooring installation for period homes is not the same job as fitting a floor in a new build. Victorian and Edwardian houses were framed before modern building standards existed, and their subfloors, joists, and wall clearances rarely suit today’s click-together boards. Homeowners often buy beautiful boards, then discover the floor structure underneath needs work first. Get the preparation wrong and even premium timber will cup, squeak, or lift within a season.
This guide covers the full process, from moisture testing to heritage compliance, so you can plan the job properly before a single board is laid.
Subfloor Preparation for Old Houses: Moisture, Levelling, and Repairs
Subfloor preparation for old houses is where most period-home flooring projects succeed or fail. Old timber joists move, sag, and absorb moisture differently to modern engineered framing, so testing comes before anything else. Skipping this step is a common mistake.
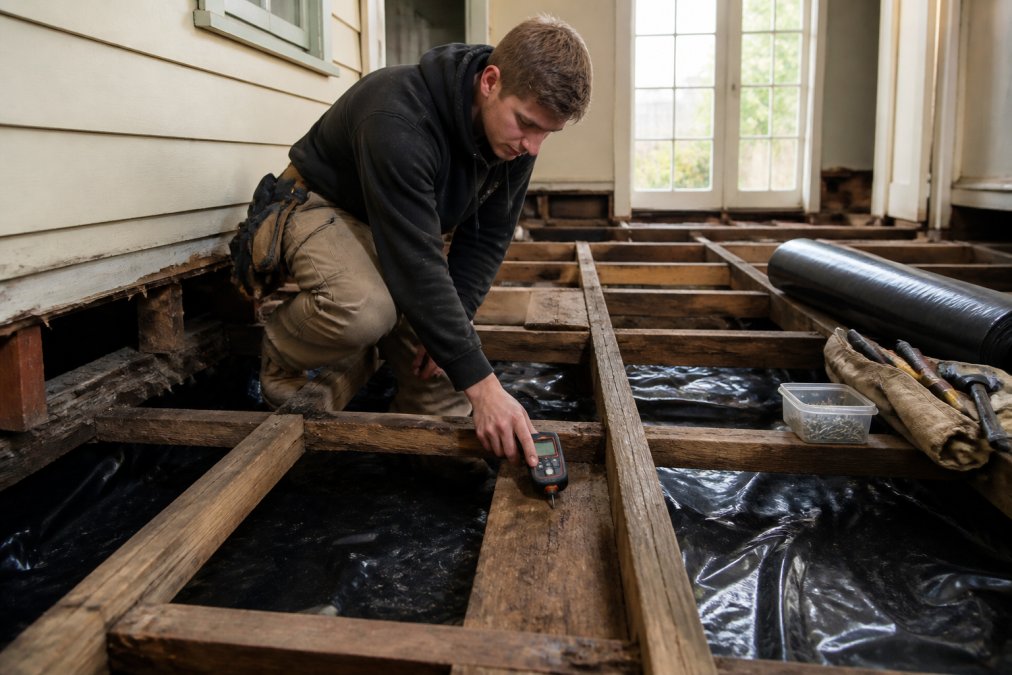
Testing Moisture Content in Timber Joists and Slabs
A moisture meter reading above the manufacturer’s recommended threshold means the subfloor is not ready. Timber needs to settle to a stable moisture content before boards go down, or the new floor will move with it. Check joists, bearers, and any slab sections separately, because they dry at different rates.
Damp-Proof Membranes and Builders Plastic
Builders plastic and damp-proof membranes stop ground moisture rising into the timber above. In older homes without a modern vapour barrier, this layer matters more than it does in new construction. Install it correctly and you protect both the subfloor and the finished floor.
Solid Timber vs Engineered Flooring for Heritage Homes
Solid timber vs engineered flooring for heritage homes is rarely a straight either/or. The decision usually splits across the house: original rooms call for one answer, extensions and converted spaces call for another. Getting that split right is what separates a restoration from a patch job.
Solid boards are milled from a single piece of timber, typically 19mm or 20mm thick, and can be sanded and refinished many times over their life. That thickness is what makes them the default choice for a genuine restoration, because it allows future owners to re-sand rather than replace. The trade-off is movement: solid timber expands and contracts noticeably with seasonal humidity, so it needs sound, dry joists, adequate ventilation beneath, and correctly sized expansion gaps at every wall.
Engineered boards are a real timber wear layer bonded to a plywood or high-density fibre core. The wear layer is what you actually see and sand, and it is measured in millimetres. A 2mm wear layer is effectively a single-sand floor; a 4mm or 6mm wear layer can take two or three light sands. For heritage-look installations over less predictable subfloors, engineered boards handle movement better and can often be direct-stuck or floated where solid boards cannot.
Restoration vs Replacement: The Decision Most Guides Skip
Most installation guides assume a new build. Period homes rarely offer that luxury. The practical question is not “solid or engineered” but “how much of the original floor can be saved”.
A common pattern in Victorian and Edwardian homes is that the front rooms retain original boards in reasonable condition, while the rear extension, kitchen, or a previous renovation has already replaced them with something mismatched. The sensible approach is usually:
- Retain and restore original boards where the tongues are intact, the boards are not cupped beyond re-sanding, and there is enough thickness left for at least one more sand.
- Splice in reclaimed or matched new boards where individual boards are damaged, rather than replacing a whole room.
- Replace only the unsalvageable sections, then blend the new work into the old with matched species, width, and finish.
Restoration is usually cheaper than full replacement, keeps the home’s character intact, and, importantly, is often viewed more favourably under heritage controls than wholesale removal. Replacing original boards in a protected property can trigger approval requirements that restoration would not.
Matching Period-Appropriate Timber Species
Matching species matters more than most homeowners expect, because grain and colour read differently under the same finish. A few common pairings for period interiors:
- Tasmanian Oak, a broad, warm-toned hardwood that suits many Victorian and Edwardian interiors and is widely available in solid and engineered form.
- Blackbutt, denser and paler, often used where a harder-wearing floor is wanted in high-traffic rooms.
- Spotted Gum, a distinctive, figured grain that suits some Federation-era homes but can look out of place against finer-grained originals.
- Reclaimed Baltic pine or Kauri, often the closest match to original boards in older homes, though supply is limited and pricing reflects that.
When matching, compare board width and thickness as well as species. A 130mm board sitting next to 80mm originals will read as new no matter how well the species matches. Where an exact match is not available, a common approach is to lay the new boards in a separate room or zone, and use a threshold or transition strip at the doorway rather than trying to blend mid-room.
If you are restoring original boards, ask for a test sand on a small, low-visibility area first. It reveals the true colour under the aged surface and confirms there is enough thickness left for a full sand.
Where Each Option Fits in a Period Home
| Situation | Sensible choice |
|---|---|
| Original boards salvageable, joists sound | Restore solid, splice damaged boards |
| Original boards beyond saving, heritage overlay applies | Replace with matched solid or engineered, check approval first |
| Rear extension or new room | Engineered, matched to the original species and width |
| Uneven or unknown subfloor | Engineered, direct-stick or floated |
| High-traffic family areas | Denser species such as Blackbutt or Spotted Gum |
Acclimatisation and Weatherproofing Before Installation
Acclimatisation means letting timber sit in the room where it will be installed until it reaches the room’s relative humidity and temperature. This typically takes several days, and rushing it is a false economy. Weatherproofing matters just as much: draughts, rising damp, and unsealed subfloor vents all affect how the finished floor performs.
Installation Methods: Floating Floor vs Direct Stick
Floating floor and direct stick are the two main methods, and the right choice depends on your subfloor and whether you need acoustic separation. A floating floor sits on underlay without adhesive, which makes it faster to install and easier to replace. Direct stick bonds boards to the subfloor with adhesive, giving a solid feel and better performance over uneven joists.
| Method | Best For | Key Consideration |
|---|---|---|
| Floating floor | Stable subfloors, faster installs | Needs expansion gap at edges |
| Direct stick | Uneven or older joists | Requires correct adhesive and cure time |
Tongue and Groove Locking Systems and Mechanical Fixing
Tongue and groove boards lock together for a tight, gap-free surface. Mechanical fixing, using nails or secret fixings into the joists, adds structural integrity where adhesive alone is not enough. On period homes, a combination of the two often gives the best result.
Herringbone and Parquetry Patterns
Herringbone and parquetry patterns suit period architecture and add visual character that straight-laid boards cannot. These patterns use more timber and take longer to install, so factor both into your planning.
Tools, Adhesives, and Fixings for the Job
The right tools and adhesive matter as much as the boards themselves. A basic kit includes:
- Moisture meter for subfloor testing
- Levelling compound and trowel
- Circular saw or mitre saw for cuts
- Flooring adhesive suited to timber
- Secret nailer or hammer and punch
- Spacers for expansion gaps
- Underlay or damp-proof membrane
Using the wrong adhesive is a common cause of board lift. Match the adhesive to the subfloor type and follow the manufacturer’s cure times.
Cost of Timber Flooring Installation: What Affects the Price
The cost of timber flooring installation depends on several variables rather than a single flat rate. Subfloor repairs, the timber species and board width, the installation method, and whether you choose herringbone or parquetry all shift the final figure. Heritage overlay requirements can also add compliance steps. Because every period home is different, pricing depends on the specifics of your subfloor and chosen finish, so it is worth getting a quote based on an on-site assessment rather than an estimate over the phone.
Heritage Compliance, Restoration vs Replacement, and Acoustic Insulation
These three issues are where period-home flooring projects most often go wrong, and they are the ones generic installation guides skip entirely. Each is worth planning for before a single board is ordered.
Heritage Overlays and Council Approval
If the property sits within a heritage overlay, external works and some internal works may need a planning permit before they proceed (planning.vic.gov.au). Overlays are set by local councils and vary considerably between them, so the same job can be permitted in one municipality and require a full application in the next.
The practical steps are:
- Check the planning scheme for the property to confirm whether a heritage overlay applies. The Victorian planning scheme guidance on heritage overlays sets out how overlays are identified and what they control.
- Contact the local council’s heritage adviser early, before ordering timber, not after. Advisers can usually tell you whether the proposed work is likely to be supported and what documentation they will want.
- Expect the focus to be on visible fabric, particularly original floorboards, skirting, and any structural timber that contributes to the significance of the place.
- Keep records of what was retained, what was replaced, and why. This is useful both for the permit process and for future owners.
A common pattern is that restoration of original boards is viewed more favourably than wholesale replacement, because it retains the original fabric. Where replacement is unavoidable, matching species, width, and profile to the originals is usually the expectation.
Restoration vs Replacement in Practice
The decision is rarely all-or-nothing. A workable approach for most period homes is to assess room by room:
- Retain where boards are structurally sound, the tongues are intact, and there is enough thickness for at least one more sand.
- Repair where individual boards are damaged, splice in reclaimed or matched boards rather than replacing the whole run.
- Replace only where the floor is beyond saving, and match the new work to the original as closely as possible.
This staged approach usually costs less than full replacement, preserves character, and sits more comfortably with heritage controls.
Acoustic Insulation Between Floors
Period homes typically have thin floorboards laid directly over joists, with no acoustic separation and often no ceiling cavity insulation. That is why footsteps, conversation, and furniture movement carry so clearly between levels. Retrofitting acoustic insulation after the floor is down is far more disruptive than doing it during installation, because it usually means lifting boards again.
Where the floor is being replaced or lifted anyway, the practical options are:
- Acoustic underlay beneath a floating floor, chosen for its impact-sound rating rather than its thickness alone.
- Mineral wool or acoustic batts between the joists, installed from below where there is access, or from above while the floor is open.
- Resilient clips and channels where a ceiling is being re-lined at the same time, which decouple the ceiling from the joists and reduce structure-borne noise.
- Sealing gaps around penetrations, between boards, and at the perimeter, since air paths carry sound as effectively as the boards themselves.
If the home has a habitable room above another habitable room, acoustic performance is worth treating as a design requirement rather than an afterthought. The Australian Building Codes Board publishes the relevant reference material on structural and building performance requirements, which is a useful starting point when scoping the work.
Plan heritage approval, restoration scope, and acoustic treatment together, before ordering timber. Each one affects the others, and addressing them after installation is significantly more expensive.
Frequently Asked Questions
How much does timber flooring installation cost for a period home?
The cost of timber flooring installation depends on several factors: the size of the area, the timber species you choose, whether you need subfloor repairs or levelling, and the installation method. Heritage homes often need extra subfloor preparation, which adds to the labour. Pricing also varies based on whether you select solid timber or engineered boards. For an accurate figure, request a quote from a specialist who understands period properties.
What is the best flooring for a Victorian house?
Solid timber flooring in a species that matches the home’s original features is often the best choice for a Victorian house. Tasmanian Oak and other period-appropriate timbers work well because their grain pattern and density suit the architecture. Engineered timber is a practical alternative if you want more stability over old subfloors. The right option depends on your subfloor condition, moisture levels, and whether you need to meet heritage overlay requirements.
Should I choose solid timber or engineered flooring for a period renovation?
Solid timber can be sanded and polished multiple times over its life, which suits restoration projects where you want to retain original character. Engineered flooring handles moisture fluctuations better and can be installed as a floating floor, making it a good fit for old houses with less stable subfloors. If your home has a heritage overlay, check what changes are permitted before deciding.
How do you ensure subfloor stability in older properties?
Start by inspecting the joists for rot, movement, or pest damage. Test the moisture content of both the subfloor and the timber flooring before installation. Install a damp-proof membrane or builders plastic where needed, and level any uneven areas. Acclimatise the new boards in the room for the recommended period so they adjust to the relative humidity. These steps prevent gaps, cupping, and long-term structural issues.

